
Many Facebook users don’t know they can change date on Facebook post. Facebook allows you to backdate posts already in progress.
If you want, you can restrict Facebook’s display or promotion of your post in your news feed.
This article will cover everything you need to know on how to change date on Facebook post, as well as other ideas related to Facebook pages or post scheduling.
These are the questions we will be answering in this article:
- Why is it important that a Facebook page’s date can be changed or modified?
- What is the best way to change a Facebook post’s date?
- Is it possible to set a date expiration for Facebook posts?
Let’s start without further delay!
Table of Contents
- How to change date of Facebook post?
- How to edit Facebook posts before publication
- Modify the date of an already published Facebook post
- How to add an expiration date to your Facebook post
- How to schedule a Facebook post on a PC
- How to schedule a Facebook post on Mobile
- How to access and edit scheduled posts on Facebook via your PC
- How to access and edit scheduled posts on Facebook via Mobile
- How can I schedule a post on a Facebook Group?
- How can I schedule a post on Facebook using a phone?
- How to edit, delete, or schedule group posts on Facebook
- How to Change Date on Facebook Post FAQs
- Conclusion
How to change date of Facebook post?
You can change the date of a Facebook post to “backdate,” i.e., alter the post date to previous dates that are not the current publishing time.
This is useful if your goal is to create a new profile or Facebook page, but you want your friends and fans to think you have been there for a while.
Facebook allows users to backdate and update Facebook posts as soon as they are being shared on their feed.
It is not possible to backdate posts via your Facebook profile. This feature is only available for the Facebook business page.
If you’re ready to backdate any posts on Facebook, the best step is to create a Facebook business page to be a media personality or influencer.
See also: A Comprehensive Guide on How to Delete A Facebook Pixel in 2022
How to edit Facebook posts before publication
This is the best way to make Facebook posts editable before they are published:
- Log in to Facebook.
- Visit the Facebook page.
- Navigate to the publishing section in the upper left corner.
- Navigate to the FB publishing tool, and click on “Creator Studio.”
- Next, click on “Create post” to start writing your post.
- Click the arrow button to select the “Share Now” option.
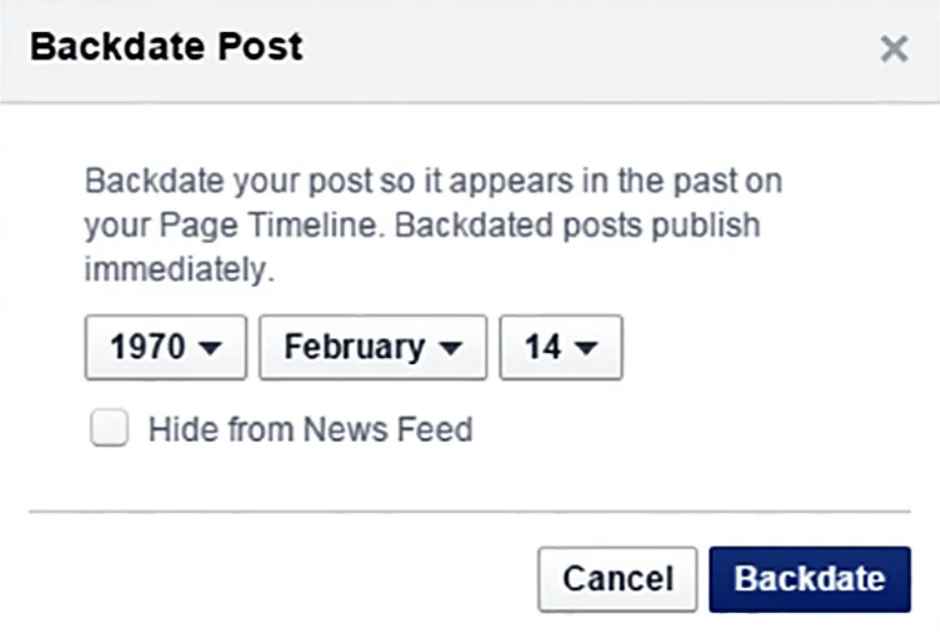
- Tap “Backdate.”
- Next, set a date for the Facebook post you wish to update.
- Select “Backdate” after you have set the date and time.
The Facebook post will instantly be backdated. It will appear on your Facebook page.
Modify the date of an already published Facebook post
If a post has been published on Facebook business pages, the user can backdate or change date on Facebook post even if it has been published.
This step will help you to do that:
- Navigate to Facebook, and you will see a list of posts.
- Go to the post on Facebook if you wish to modify the date.
- Click the hamburger icon in the upper right corner of the post.
- Select “Edit Date” from the menu.
- You can edit the publication date and time at this stage.
- After you are done, click the “Done.”
Viola! Your Facebook post has been successfully edited to change the date and time.
How to add an expiration date to your Facebook post
Let’s say you have an eCommerce store on Facebook. How can you offer limited-time coupons for your customers?
Facebook has a useful feature that allows you to add an expiration date for a Facebook post so that it doesn’t appear in your news feed.
This will help prevent confusion and make your page more organized.
Here’s how you can add an expiration date to your Facebook page.
This link will launch the Facebook creator studio. You can also access your Facebook page.
On the left panel, select “Publishing Tools.” Next, click on “Creator Studio” in the left-hand corner of the screen.
- After you have accessed Creator Studio, click the “Create post” option.
- Next, create your Facebook post. However, instead of selecting the blue “Share Now” option, choose the “Share Now” option with an “arrow.”
- Select “Schedule” from the menu. This will allow you to schedule your Facebook post.
- Next, click on the “Stop News Feed Distribution” option. Click the option to add an expiration time and date to your Facebook post.
- After adding an expiration date, choose the “Schedule.”
Remember that Facebook posts will not be deleted or varnished after the expiration date expires.
If they visit your business page, their followers can still access the post. The post will not be visible in the News Feed forever.
You can also see 3 Powerful Online Marketing Strategies For Small Business
How to schedule a Facebook post on a PC
These steps will allow you to schedule a Facebook post from your desktop.
- Access Facebook from your computer via your web browser. Navigate to the left-hand panel, and you will find your business or community page.
- Select Publishing Tools from the left panel.
- Click the blue-button to create a post and then add it.
- Click the arrow next to the publish option and “Schedule Post.”
- Add the date and time for the post-publication to the lower right and click “Schedule.”
How to schedule a Facebook post on Mobile
You must install Facebook Pages Manager if you’re using a smartphone.
- Go to your page and click on the “Post” option. It is colored grey. Select the jagged line at the lower part.
- Next, click on the Create post option.
- Write your post, then click “Next” in the upper-right corner.
- The “How do I want to publish it?” button will appear. Your post is already set as default. Click the button and select “Schedule.”
- Find the “change scheduled hour” field and enter the time and date you want to publish your post.
- In the upper right corner, select “Schedule.”
How to access and edit scheduled posts on Facebook via your PC
Many Facebook users are faced with the problem of not being capable of updating their scheduled posts.
Here’s how it works:
- Navigate to the business page and select Publishing Tools from the left panel.
- Select Scheduled posts to access a list of all planned posts. You can then click on the post that you want to edit.
- You can use “actions” to post immediately, reschedule or remove posts, and many other things. You can modify the content of your scheduled posts using the hamburger icon (…). This includes pictures and other important information. Click the hamburger icon to schedule the post for a later date.
How to access and edit scheduled posts on Facebook via Mobile
- Launch the Facebook Pages Manager app on your smartphone and choose the tool item in the lower right.
- Tap Scheduled posts on the Sharing Tools option.
- To reschedule posts at a later time, click the hamburger icon.
- The reschedule option for posts is only available to smartphone users. You will need a web application to update any post’s content.
You can also see How to Use Google Search Console in 2022
How can I schedule a post on a Facebook Group?
It is easy for group administrators and moderators to schedule posts in Facebook groups. Go to your group page, and click “What’s On Your Mind. ” To add date and time, click on the calendar icon. Next, click “Schedule.”
How can I schedule a post on Facebook using a phone?
- Start the Facebook mobile app on your smartphone.
- Navigate to the group page.
- Click the schedule option. Next, click the slider to activate “Schedule Post.”
How to edit, delete, or schedule group posts on Facebook
- Access your group page to update your Facebook group post.
- Start Admin Tools and choose Scheduled Posts.
- Tap the hamburger icon (…) to edit the content of your posts.
- You have three options: Delete, Edit, Post now, or Reschedule.
How to Change Date on Facebook Post FAQs
Can I backdate a Facebook post?
Here’s how you can change date on Facebook post.
- Log in to Facebook with your password/email address/password.
- Navigate to the top of the page, and click on the “Posts” tab.
- Select “Create new posts.”
- Enter the date and time you want to backdate the post on Facebook and click “Post.”
Can I change date on Facebook post?
Select the post to edit or change the date. Select the hamburger icon in the lower corner. Navigate to Edit Post, then choose the date you wish to edit.
You can also see 5 Reasons Why People Are Afraid of Google SEO
Can I retrieve an old post from Facebook?
You can retrieve expired posts from Facebook easily. Navigate to the Activity Log to search for the post you are looking for. Click the small arrow at the top right and click “Download.”
Facebook has tagged my post as “expired” Why?
There are many reasons this could happen. You could have set a time limit to prevent the post from being visible forever.
The post will still be visible on the user’s timeline as long as it has not expired. If the post has expired, it won’t appear on your Facebook timeline.
Another possibility is that your post was removed because it violates Facebook’s community standards.
What does “Facebook post expired” mean?
This could indicate that the post was removed by the owner or disabled by Facebook because it violates its user agreement policy.
Conclusion
This concludes the tutorial on how to change date on Facebook post. You must ensure that you are properly logged into Facebook before making any changes to your post.
You can only backdate a post through a business page. Good luck on how to change date on Facebook post!
Also read:
Ways to Secure Your WordPress Website